(Note: The brown is true to the colour of the egg but the green
of the drawing and the background was actually white.)
of the drawing and the background was actually white.)
My favorite method of colouring the eggs is to get brown or red onion skins from the grocery store. They are all too willing to get rid of them but they tend to treat you like you have just escaped from somewhere when they find you rooting through the boxes of oinion and stuffing bags full of the loose skins. These days they remove them from the boxes every day, so invariably I have to ask them if they have any. They may produce three skins and I have to explain... "No! I need as many as I can get.... All you have of them!" ("Surrrre, Lady! You colour your eggs with them....").
I take the skins and wrap them around the eggs (You can soak the skins in water to soften them before you do this step). In the days before pantihose, we used thread to wrap around them to hold the skins on. Now, I wrap them in the skins and drop them into a length of pantihose, making a knot in between each egg, or place them in one of those net bags that come with the oinions. Using thread as well as placing them in the pantihose usually makes interesting lines on them.
For brown and yellow eggs, use brown onion skins, for red use ...errr... Red onions. You can combine the two but I would boil them in a separate pot.
I drop them in a pot of sold water, bring it to a boil and boil them for 7 minutes and then let them soak until the water is cool enough to retreive them.
When you unwrap them, you will find the most amazing stained glass patterns on your egg.


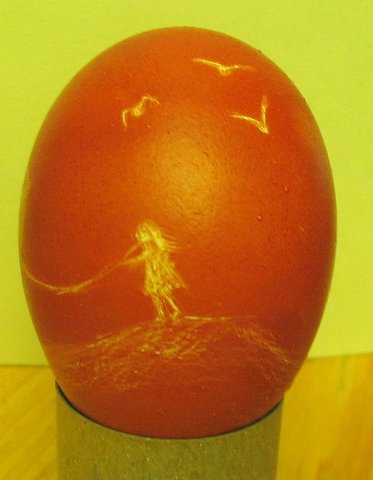
My egg below was simply boiled using Variation 1, below.
To enhance the colour and pattern, wipe with a cloth and a drop of cooking oil.
Variations:
- You can simply place the loose skins and eggs into a pot of cold water and boil them which gives the egg a more or less flat brown colour (or red, if you use the red skins). Nice, but the results using the other method is what I like. With the solid colour, you can do as I did below and scratch into the surface to make a picture.
- You can also place flowers, bits of cedar greens, leaves or shaped stickers on the egg before wrapping the egg. This leaves either a stencil effect or a colored impression of the object you used. Just make sure you use leaves and flowers that are edible! (see image immediately below)
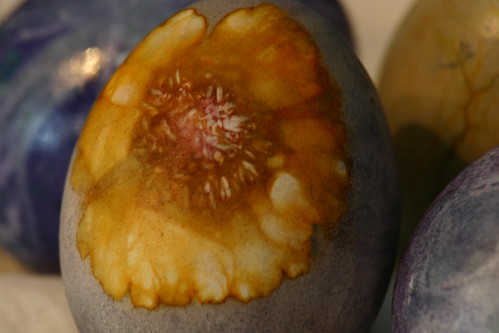
(Again, not my photo)


No comments:
Post a Comment